Why Your Front Derailleur Stops Shifting Up
Front derailleur troubleshooting has gotten complicated with all the forum arguments and conflicting YouTube tutorials flying around. As someone who has spent more weekends than I’d like to admit crouched in a garage and wrenching with local trail clubs, I learned everything there is to know about why these things stop shifting up. Today, I will share it all with you.
Ninety percent of the time, it’s one of three things: a slack shift cable, an over-tightened high limit screw, or a bent cage. That’s it. Nothing sinister. The trick is knowing which one you’re dealing with before you start touching anything — at least if you want to avoid chasing the wrong fix for twenty minutes while your ride window closes.
Check Cable Tension First
Start here. Seriously.
Even if you’re pretty sure the cable is fine, the cable is probably the issue. Find the pinch bolt where the shift cable enters the derailleur body — on most modern setups, it’s a 4mm or 5mm Allen bolt on the side of the cage. Pull the cable gently with your fingers. It should feel like a guitar string, not a clothesline. More than a millimeter or two of give without any cage movement? You’ve found your culprit.
Now hunt down the barrel adjuster. It’s usually a knurled collar where the cable meets the derailleur, though some bikes tuck it at the shifter end instead. Turn it counterclockwise — toward you — in half-turn increments. After each half-turn, click the shifter once and watch whether the cage actually moves outward toward the big ring. Watch the cage, not the lever.
The cage should glide outward smoothly when you press the shifter. Still stationary after two or three turns of the barrel adjuster? The cable has too much slack overall. Loosen the pinch bolt, pull the cable taut by hand, re-tighten while holding tension, then start over with the barrel adjuster.
Probably should have opened with this section, honestly. The temptation to immediately blame limit screws or cage alignment is real when you’re standing over the bike frustrated. Don’t make my mistake. Cable tension resolves this eight times out of ten, usually in under ten minutes.
Adjust the High Limit Screw If Tension Is Not the Issue
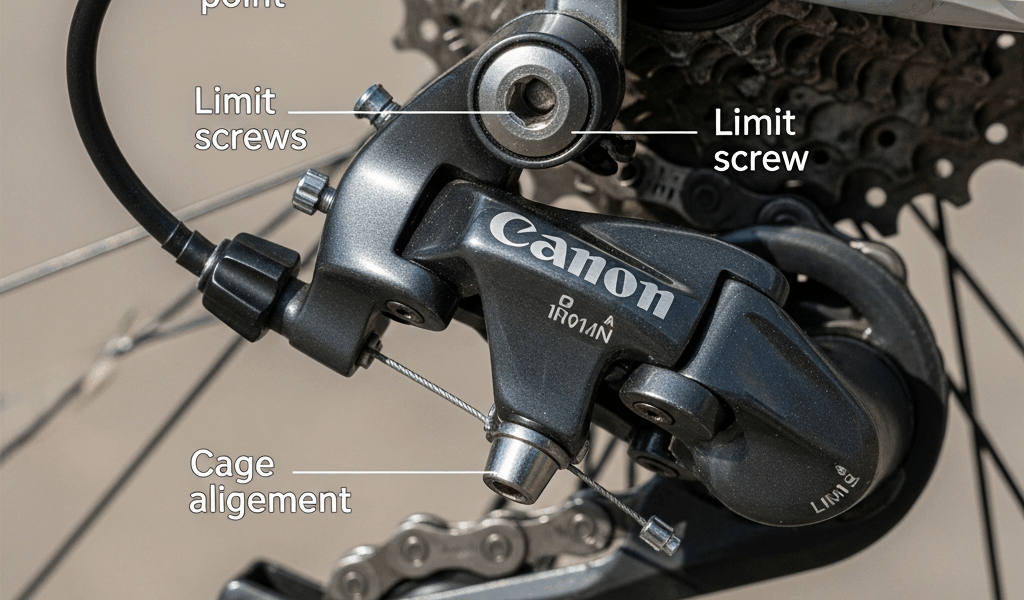
But what is the high limit screw? In essence, it’s a small set screw — marked “H” on virtually every front derailleur built in the last two decades — that physically stops the cage from swinging too far outward past the big ring. But it’s much more than that. When it’s dialed correctly, the cage stops just before touching the chainring teeth. Wind it too tight and the cage physically can’t push the chain all the way up. That’s your problem.
Here’s where people get confused: which direction do you turn it? On most modern derailleurs, the H-screw sits recessed on the side of the derailleur body facing the frame. Accessible from the outside — clockwise tightens it, counterclockwise loosens it. Screw on the opposite side, reverse that logic. Trace the screw direction before touching anything. Thirty seconds of observation saves five minutes of frustration.
Shift to the middle chainring first. Then try to upshift to the big ring from the shifter. If the cage moves but visibly stops short — you can see a gap between the outer cage plate and the big ring teeth — the H-screw is too tight. Back it off a quarter turn counterclockwise. Try again. Repeat in quarter-turn increments until the chain climbs to the big ring smoothly and the cage sits parallel to it.
Once you can shift up cleanly, shift back down. A properly set H-screw lets you upshift without hesitation and downshift without dragging or that grinding noise that makes other riders look over at you.
Inspect the Derailleur Cage for Damage or Misalignment
A bent or misaligned cage defeats perfect cable tension and a perfectly set limit screw every single time. That’s what makes cage alignment so quietly maddening to us home mechanics — everything else looks right and the bike still won’t shift.
Stand to the side of the bike and look at the outer cage plate. It should run parallel to the big ring teeth with roughly 1–3mm clearance at the closest point. Cage tilting inward toward the frame? Derailleur body looking rotated on the seat tube? That’s your problem right there.
On clamp-on derailleurs — which covers most bikes built after about 2005 — check whether the clamp has rotated or loosened on the seat tube. Tighten the clamp bolt and see if the cage corrects itself. On older brazed-on setups, a slightly bent cage can sometimes be coaxed back with careful leverage, though I wouldn’t push it hard.
Bent cages don’t bend themselves. They bend because the bike got dropped, crashed, or walked into a fence post — I’m apparently the type of person who has done all three, and a Shimano Tiagra FD-4700 works for me now while my old bent cage never would cooperate no matter what I tried. If you see visible creasing or crack lines in the metal, stop. A cracked cage cannot be safely straightened. Shimano Sora or Tiagra front derailleurs run between thirty and sixty dollars. Swap takes about thirty minutes with cable cutters and a basic Allen wrench set.
Cage looks cosmetically fine? Then this isn’t your issue — go back to cable tension.
When to Take It to a Shop
Two situations genuinely warrant a shop visit. A cracked derailleur cage — unsafe, full stop, needs replacement. And a bent derailleur hanger that won’t hold the derailleur parallel to the chainrings even after you’ve tightened everything down. Shops have alignment tools designed specifically for hanger correction. Doing it by eye at home risks making things measurably worse.
Everything else on this list — cable tension, limit screws, minor cage misalignment — you can handle yourself. So, without further ado, grab a 4mm Allen wrench and a little patience. Most front derailleur failures are a ten-minute fix, and nine times out of ten, the barrel adjuster is where it ends.


Stay in the loop
Get the latest cycle tech trends updates delivered to your inbox.