Why Disc Brakes Rub After You Reinstall a Wheel
Disc brake rubbing has gotten complicated with all the conflicting advice flying around. “Loosen this bolt.” “Squeeze that lever.” “Just live with it.” As someone who has yanked wheels off bikes for flats, travel packing, and mid-ride repairs more times than I can count, I learned everything there is to know about this particular frustration. Today, I will share it all with you.
You pull the wheel, fix the flat, put everything back together. Five minutes of work. You spin the wheel and — grinding. That sound. It feels like a betrayal, honestly. Like the bike is punishing you for touching it.
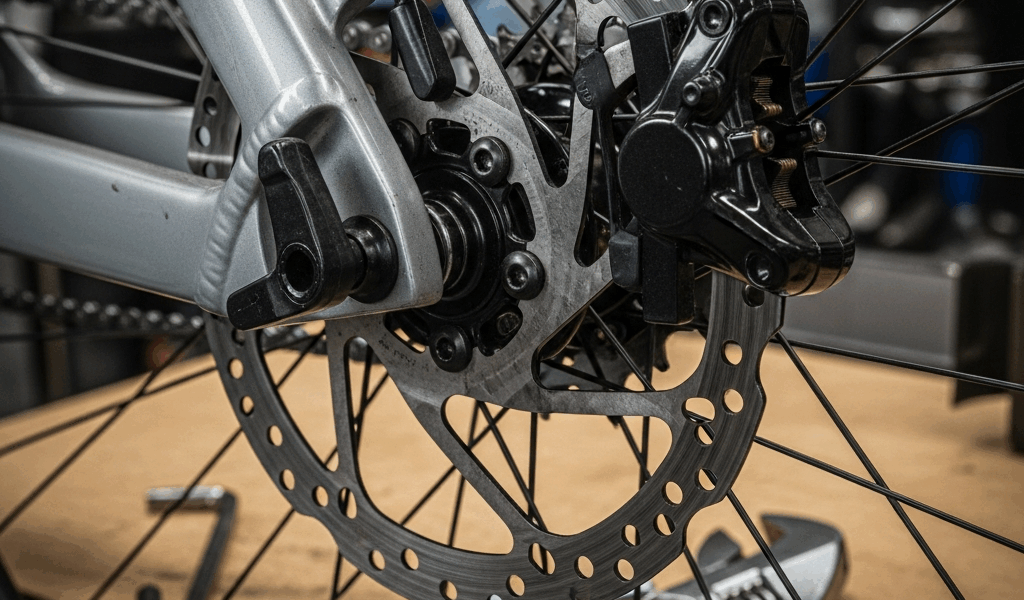
But what is disc brake rub, really? In essence, it’s the rotor making contact with one or both brake pads during wheel rotation. But it’s much more than that. It’s a signal that something shifted during the removal process — and usually one of three things caused it.
Two things happen the moment a wheel comes out. The rotor shifts position relative to the caliper because the hub is no longer centered by the axle. And your brake pads drift inward — especially if someone accidentally squeezed the lever while the wheel was off. On thru-axle bikes, an improperly seated axle tilts the hub and shifts the rotor 1–2mm. Enough for immediate contact. Quick-release skewer bikes fail differently: uneven tension pulls the hub slightly off-center. That’s what makes this problem so endearing to us cyclists — it has multiple causes and each one feels just obvious enough to miss.
So, without further ado, let’s dive in.
Step 1 — Check the Axle Is Fully Seated
This is the step everyone skips. I skipped it myself the first three times I dealt with this. Don’t make my mistake.
Reinstalling a thru-axle feels straightforward. Thread it in, hand-tighten, done — except you’re not done. A partially seated axle leaves the hub floating slightly, which tilts the rotor inside the caliper. The fix is simple but specific.
Hand-thread the axle until it stops. You’ll feel genuine resistance — not the resistance of stripped threads, but solid, mechanical resistance. Keep turning. Most modern thru-axles want 8–12 foot-pounds of torque, though Shimano, RockShox, and DT Swiss each publish slightly different specs. If your bike came with a torque wrench, use it. If not, feel for firm, even pressure as the axle seats. The lever or quick-release handle should close flush against the dropout or frame. Gap present? The axle isn’t home yet.
For quick-release skewers, tension matters as much as insertion depth. Uneven tension — one side tighter than the other — pulls the hub off-center. Close the quick-release lever against firm resistance. It should take real hand pressure to shut it fully. Closes too easily? Back off the opposite nut and retighten.
Spin the wheel now. Rubbing gone? You’re done. Still rubbing? Move to Step 2.
Step 2 — Reset the Brake Pads Before Touching the Caliper
Probably should have opened with this section, honestly. Resetting the pads solves the problem about 60% of the time — no caliper adjustment required.
Brake pads creep inward when the wheel is out. This happens whether you pressed the lever or not. Gravity and internal spring tension pull them together slowly. Look at the caliper from the side and check the gap between the rotor and each pad. On a properly spaced brake, that gap runs roughly 1.5mm per side. Both pads visibly closer than that? They’ve crept in.
Use a flat tool — a tire lever, a butter knife, even a clean plastic ruler — to gently separate the pads. Slide it between the rotor and one pad, apply steady even pressure, push the pad back about 2mm. Don’t force it. You’re just giving the rotor clearance, not blowing the system open. Rotate the tool and repeat on the other side.
No tools? Use a clean finger. Press your fingertip against the pad and apply steady backward pressure. Takes longer, but it works. The brake fluid inside shifts slightly and the pads reset to their resting position.
Spin the wheel again. Most riders stop here.
Step 3 — Realign the Caliper If Rubbing Continues
Axle seated, pads reset, still rubbing. Now the caliper itself is the problem — it’s sitting in the wrong position relative to where the hub actually landed. The fix uses self-centering: you let the brake system find its own natural position instead of forcing it.
Locate both caliper mounting bolts. One sits on the leading edge, one on the trailing edge. Loosen both together using a 5mm Allen key — Shimano uses 5mm, SRAM uses 6mm, so check before you grab the wrong one. Loosen them just enough that the caliper floats freely. You’re not removing them. Most riders make the mistake of loosening one bolt all the way first, which lets the caliper rotate unevenly and makes things worse.
Spin the wheel forward. Watch the rotor pass through the caliper. Dragging one side? Stop spinning.
Pull the brake lever firmly — confident pressure, not violent yanking. Hold it two to three seconds. The brake fluid pushes the pistons outward and the caliper floats around the rotor until both pistons make even contact. That’s self-centering happening in real time. With the lever still held, tighten the leading bolt first, then the trailing bolt. Alternating prevents the caliper from twisting under pressure.
Tighten in two passes: first pass at 4–6 foot-pounds, second at 6–8 foot-pounds. No torque wrench? Tighten until snug and stop. Over-tightening bends the caliper bracket — I’ve seen it happen on older Shimano BR-MT200 brackets and it’s an annoying repair.
Release the lever. Spin the wheel. The rubbing should be gone.
Still Rubbing — Less Common Causes to Check
A bent rotor will rub even after perfect alignment. Hold a light source behind the caliper and look at the rotor edge as it spins — you’re watching for a consistent gap. Gap widens and narrows as the rotor turns? The rotor is bent. A rotor truing tool runs $15–$30 and handles minor bends. Significant bends require full rotor replacement. Honestly, if the bend is visible to the naked eye, take the bike to a shop. DIY truing on a badly bent rotor usually makes it worse.
Contaminated brake pads drag harder than misaligned rotors. Rode in wet conditions recently? Splashed the brakes with chain lube? The pads may have absorbed oil. I’m apparently very bad about keeping chain lube away from my rotors and contaminated pads are basically a recurring expense at this point. Contamination rubbing feels lighter and more intermittent than alignment rubbing — it comes and goes. Replace the pads. They run $20–$50 depending on brand, and Shimano J02A resin pads are a perfectly decent affordable option.
Frame or fork dropout wear is rare but real. If the dropout is bent or worn unevenly, the axle won’t seat the same way twice. Install and remove the wheel three times. If the rubbing position shifts each time, suspect dropout wear. A professional mechanic can check this with tools most home mechanics don’t own.
Start with axle seating, move to pad reset, then caliper alignment. That sequence fixes 95% of cases — and the remaining 5% usually have a bent rotor or contaminated pads written all over them.


Stay in the loop
Get the latest cycle tech trends updates delivered to your inbox.