What Chain Skipping Actually Feels Like
Chain skipping has gotten complicated with all the conflicting advice flying around. But I’ve been wrenching on bikes for about twelve years now, and I learned everything there is to know about this specific problem the hard way — a $40 chain, a worn cassette, and a very embarrassing mid-climb meltdown on a 12% grade outside Asheville. Today, I will share it all with you.
Here’s the scenario: you’re grinding up something steep, or you’ve just jumped out of the saddle to sprint, and then — pop. That sudden lurch. Your pedal pressure goes nowhere for a half-second, the chain skips across the sprocket, and your legs are briefly pushing against air. Momentum gone. Rhythm gone. Dignity mostly gone.
Sometimes it’s just one gear. Sometimes it’s random, hopping around the cassette like it’s looking for something. The problem almost always gets worse under hard load — which is why you notice it on climbs instead of flat ground where you’re just spinning easy. That’s not a coincidence. That’s physics.
But what is chain skipping, exactly? In essence, it’s a friction failure — chain teeth not engaging fully with whatever sprocket you’re on. But it’s much more than that. It could be the chain. The cassette. The chainring. The derailleur cable. Most repair guides just blame the chain and stop there. I did exactly that once. Bought a new chain, installed it, still skipped. Because my cassette was shot. Don’t make my mistake.
Check Chain Wear First
Before you buy anything, measure your chain stretch. I know it feels backwards — shouldn’t you just look at everything first? No. Start here.
You’ve got two options. A chain checker tool is the proper way — a small gauge, runs about $8–15 from Park Tool or Pedro’s. Slide it onto the chain while it’s still on the bike. Red zone means you’re past 0.75% wear. Replace it immediately. Yellow zone, somewhere between 0.5% and 0.75%, means you’re close. Green means you’re fine for now.
The ruler method also works. Pin center to pin center, 12 links out. Should be exactly 152.4mm on a fresh chain. Hit 153.3mm or beyond? That’s 0.75% stretch. My Park Tool CC-3.2 checker broke on a camping trip once, and I used a metal ruler for three months straight. Slower. Still accurate.
Here’s the crucial part that almost nobody mentions: a worn chain skips on a new cassette. A new chain also skips on a worn cassette. Wear levels have to match — or you get that skipping sensation regardless. So measure first. Replace if needed. You might solve everything right there. You might not. But you’ll have ruled out the most common cause.
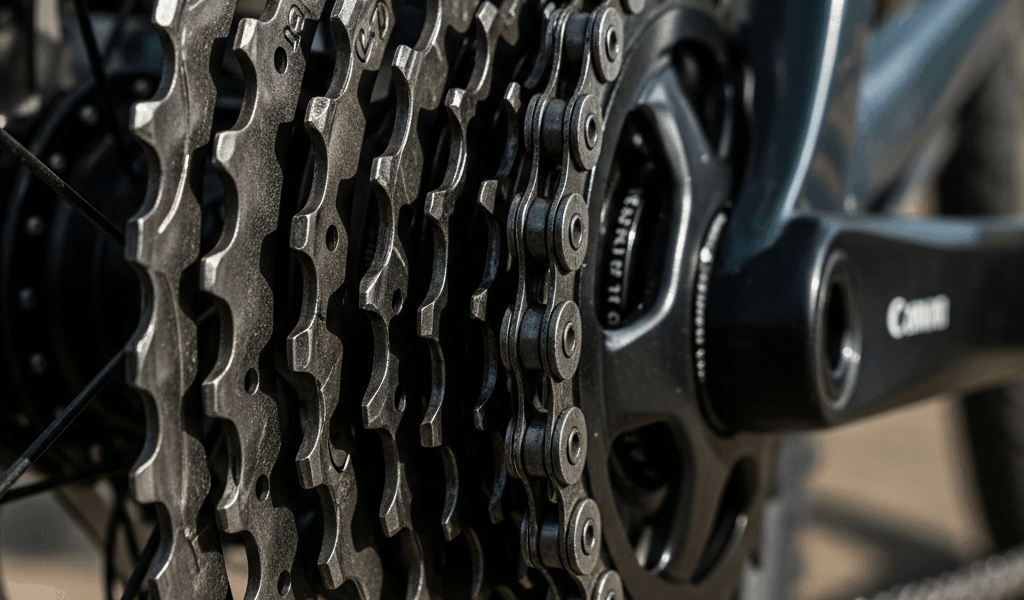
Inspect the Cassette for Worn or Hooked Teeth
Frustrated by a chain that kept skipping even after replacement, I eventually pulled off my rear wheel and actually looked at the cassette teeth up close using a flashlight. That was the moment I understood what “shark fin” wear actually looks like in person versus in a diagram.
Healthy sprocket teeth have a rounded, almost blunt profile — symmetrical on both sides. Worn teeth develop a hooked or scooped appearance on the drive side, like a wave breaking forward. Once you’ve seen it, you can’t unsee it. Grab your flashlight and look at your smallest sprockets first — your 11t, 12t, or 13t. Those take the most abuse during accelerations and hard climbs. The bigger sprockets in the 25t–32t range usually outlast them significantly.
Push the chain sideways while it’s sitting on a suspect cog. A worn tooth will let the chain visibly lift away from the sprocket profile. A healthy tooth keeps things seated. You can also drag your fingernail across the teeth from the side — worn cassettes feel sharp and serrated, almost like a saw. New ones are smooth and blunt.
That’s what makes the cassette inspection so satisfying to us home mechanics — it’s one of those rare diagnostic moments where you can feel the answer with your hands, not just measure it. Skip happening on just one specific gear? That cog is almost certainly your culprit. Even if the chain measures fine. Even if you installed new chainrings last month. One bad cog ruins that gear entirely. Cassette replacement runs $40–120 depending on whether you’re running Shimano 105 versus SRAM Rival and how many speeds you’re working with.
Adjust Rear Derailleur Cable Tension
Probably should have opened with this section, honestly. It’s the easiest fix and somehow still the most overlooked one.
Find your barrel adjuster — the small threaded cylinder where the cable enters the rear derailleur body. Turn it counterclockwise. Half-turn increments. Each half-turn adds tension, pulls the cable slightly tighter, nudges your derailleur inward toward the smaller sprockets. It takes maybe ninety seconds.
I’m apparently very sensitive to cable tension and a quarter-turn makes a noticeable difference for me, while my riding partner can barely tell until it’s a full turn off. So, without further ado, let’s dive into the actual test: shift into the gear where you noticed the skipping. Pedal lightly — no hard force yet. Did the skip go away? Great, keep adding quarter-turns until upshifts are crisp and the skip is completely gone.
An under-tensioned cable parks your derailleur just slightly off-center from the sprocket you’re targeting. The chain doesn’t seat fully. You get a skip that looks identical to worn teeth or chain stretch — but it’s purely a cable problem. Five minutes. No parts. No money spent. Check this before you order anything online.
Check Chainring Bolts and Chainring Condition
Loose chainring bolts produce a very specific kind of skip — rhythmic, predictable, tied to crank rotation. Every single pedal stroke produces a pop at the same rotational point. Not random. Not gear-dependent. Consistent. That’s your tell.
Grab a 4mm hex key — or 5mm depending on your crankset, so check before you start. Work through all five bolts. Snug, not cranked down. Most manufacturer specs call for 10–12 newton-meters. I use a Tekton torque wrench set to 10Nm and it takes about three minutes. Finger-tight plus a quarter-turn works fine for home mechanics who don’t own a torque wrench — just don’t go ham on it.
While you’re already down there with your hands on the crank, inspect the chainring teeth themselves. One bent tooth, cracked tooth, or obviously damaged tooth will catch and skip the chain at that same specific point in every pedal stroke. Replacement rings run $30–80 depending on your cranks and tooth count — a Shimano 105 50t outer ring is around $45 last I checked.
Chainring wear is trickier to see than cassette wear. But if your skipping is happening randomly across the front rings, a heavily worn chainring can start splitting engagement between two cogs at once. Rare on modern alloy rings. Less rare on older aluminum cranks or anything budget. Worth a look if everything else checks out.
The Diagnostic Decision Tree
Skipping on all gears, all the time? Start with chain wear measurement and chainring bolt tightness.
Skipping on exactly one specific gear? Inspect that individual cassette sprocket for hooked teeth — probably just that one cog.
Skipping only when you’re standing and hammering hard? Cable tension adjustment first. It costs nothing to try.
Rhythmic pop every single pedal stroke regardless of gear? Tighten those chainring bolts before you do anything else.
Chain skipping under load is fixable — every time, without exception. You just have to check the right component first instead of throwing parts at it blindly. I wasted $40 on a chain I didn’t need. You don’t have to.


Stay in the loop
Get the latest cycle tech trends updates delivered to your inbox.