Why Pedal Clicks Are So Hard to Track Down
Bike pedal clicking has gotten complicated with all the bad advice flying around. As someone who spent three weeks chasing a ghost noise through my entire drivetrain, I learned everything there is to know about diagnosing this particular misery. Today, I will share it all with you.
Here’s the thing nobody tells you upfront: the click travels. It migrates up through the crank, bounces through the frame, and lands somewhere that sounds completely convincing — at least if you’re not expecting to be deceived. You hear pedal. You assume pedal. You replace the pedal. The click comes back on your next ride. Sound familiar?
But what is a pedal click, really? In essence, it’s metal moving against metal in a place it shouldn’t be moving. But it’s much more than that — it’s a diagnostic puzzle with four distinct suspects: the pedal threads, the cleat interface, the crank arm bolt, and the pedal bearings themselves. Most guides online fixate on one and send you home with the wrong answer. This one doesn’t. So, without further ado, let’s dive in.
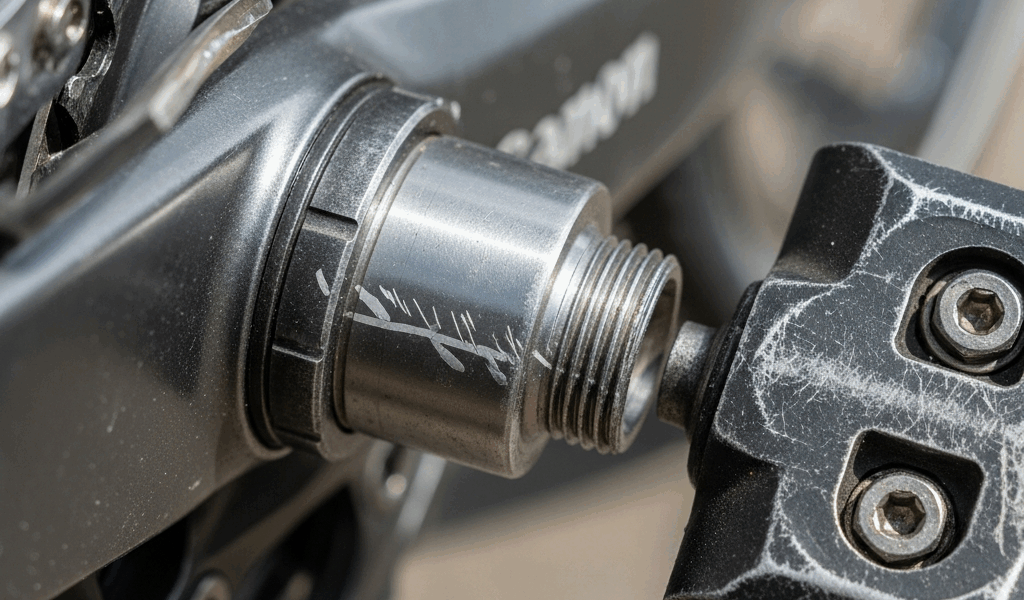
Step 1 — Check and Regrease the Pedal Threads
Metal-on-metal contact at the pedal threads causes more clicks than anything else. Don’t make my mistake — I pulled a perfectly good set of Shimano SPD-SL pedals off my bike, paid $140 for replacements, and the noise came back within forty minutes of my next ride.
What actually happens is pretty simple. The threads where your pedal screws into the crank arm dry out. Road salt, sweat, a little oxidation — all of it strips away whatever protective layer existed. Under load, that bare interface moves microscopically. Rhythmic clicking. Every pedal stroke. Perfectly timed to your cadence, which is why it’s so maddening.
The fix:
- Pull both pedals with a 15mm pedal wrench. Left pedal is reverse-threaded — turn it clockwise to remove. Your first instinct here will be wrong. Everyone’s is.
- Look at the pedal shaft where it threads into the crank. Scrub out dirt, old grease, and any corrosion. A wire brush works. Fine steel wool works too.
- Inspect the threads on both sides. Stripped threads mean crank arm replacement — rare, but worth checking before you assume everything’s fine.
- Apply a light coat of grease or anti-seize to the pedal threads. I use Shimano’s own pedal grease — formulated for exactly this, runs about $8 at any shop.
- Reinstall and torque to 35 Newton meters. A click-type torque wrench takes the guesswork out. Hand-tight plus a quarter turn works in a pinch, honestly, but get a torque wrench eventually.
Take the bike somewhere quiet and ride for a few minutes. Nine times out of ten, done. If the click survives, move to Step 2.
Step 2 — Inspect the Cleat and Cleat Bolts
Probably should have opened with this section, honestly. Loose cleat bolts are the second-most common offender — and I’ve watched riders yank perfectly functional pedals off their bikes because nobody mentioned checking the three small bolts holding the cleat to their shoe sole.
Those bolts flex under load. As they flex, they produce exactly the rhythmic clicking sound that sends you spiraling into pedal replacement territory. That’s what makes this diagnosis so endearing to us cyclists — the actual problem is usually something embarrassingly simple.
- Flip your cycling shoe over and find the three cleat bolts under the cleat plate.
- Wipe the mounting surface clean with a damp cloth. Dried sweat, grit, and decomposed shoe material all feed micro-movement. Get rid of it.
- Put a thin layer of grease under the cleat plate before reinstalling. Friction layer. Prevents flex.
- Torque each bolt to 8–10 Newton meters in a star pattern — bolt 1, bolt 3, bolt 2. Uneven torque creates rocking. Don’t crank them all the way down in sequence.
- Grab the shoe and wiggle the cleat side-to-side. Any movement means you tighten incrementally and retest.
Worn cleats cause clicking too. If your cleat wobbles even when the bolts are torqued correctly, the plastic has internal damage — no amount of tightening fixes that. Replacement cleats run $25–$50 depending on the system. Most serious riders need new ones every 18–24 months.
Step 3 — Check the Crank Arm Bolt and Interface
A loose crank arm bolt mimics a pedal click so convincingly that most riders skip this step entirely. I’ve seen it happen. Repeatedly. At my local shop, this is practically a weekly conversation.
Shimano’s Hollowtech II system uses a pinch bolt clamping the spindle. Square taper cranks use different geometry — same principle. If that bolt loosens, the spindle moves against the crank arm under load. The result sounds exactly like it’s coming from your pedal. It isn’t.
- Remove your pedal. You already know the left one unscrews clockwise.
- Check the crank arm interface for corrosion or dirt. Small brush, clean it out.
- Look up your torque specs: Hollowtech II sits at 12–14 Nm, square taper at 35 Nm. Your crank manufacturer’s website has the exact figure.
- Set your torque wrench to spec and test both sides. You’ll feel immediately if something’s off.
- If it’s loose — remove the bolt, apply a small amount of grease to the contact surface, reinstall to spec. Done.
The Park Tool TW-6 might be the best option here, as crank bolt diagnosis requires precise torque measurement. That is because even slight under-torquing produces intermittent clicks that appear and disappear unpredictably. The TW-6 costs around $60 and lasts essentially forever. Worth every cent.
Step 4 — Service or Replace the Pedal Bearings
If Steps 1 through 3 gave you silence and the click came back — bearings. Least common source on this list. Still happens.
Remove the pedal, hold the body, wiggle the spindle laterally. Any movement at all means the bearings have worn or dried out. You’ll feel a distinct click as the spindle rocks inside its housing. Pretty unmistakable once you know what you’re feeling for.
While you won’t need a full workshop setup, you will need a handful of the right tools — and the answer depends on what kind of pedals you’re running.
Serviceable platform pedals — MKS, VP, most budget models — can be taken apart. Clean the bearings, repack with fresh grease, extend the life another season or two. Bearing press or professional service runs $30–$50. I’m apparently a VP Components person and their pedals service easily, while sealed Shimano road pedals never open without destroying something.
Sealed-cartridge road pedals from Shimano, Campagnolo, or Look use pressed bearings. Non-serviceable. If they’re worn out, replacement is the answer — full stop. Used Shimano 105 pedals run $40–$60 online. Budget pedals under $30 are cheaper to replace than repair. That’s just the math.
First, you should take your pedals to a shop if you suspect bearing damage — at least if you don’t have bearing press experience and a few hours to spare. The $20–$30 diagnostic fee beats replacing components that only needed regreasing.
After finishing all four steps, test ride somewhere quiet. Parking lot. Calm side street. That was my method — still is. The click should be completely gone. If it persists after all this, you’re likely dealing with a frame crack or a separate drivetrain issue that only sounds like a pedal. That conversation happens in person, with a mechanic who can put hands on the bike.


Stay in the loop
Get the latest cycle tech trends updates delivered to your inbox.