Why Your Tire Loses Air While the Bike Sits
Bike maintenance has gotten complicated with all the conflicting advice flying around. Pump it up. Check the valve. Replace the tube. Repeat forever. I’ve been there — standing in my garage at 7am, staring at another flat tire, genuinely considering whether cycling was worth it.
As someone who spent three weeks chasing phantom punctures on a 2019 Trek FX3, I learned everything there is to know about overnight flats the hard way. Today, I will share it all with you.
The actual culprits are exactly three things. A slow puncture too small to spot without water submersion. A valve core that’s loose or simply worn out. A rim strip that’s torn or shifted, leaving spoke holes completely exposed. Most guides skip straight to patching — which is why you patch it Tuesday night and it’s flat again Wednesday morning. This is a diagnostic sequence that actually works, start to finish.
Step 1 — Check the Valve First
Start here. Sounds backward, I know.
Remove the wheel. Grab a spray bottle — soapy water, dish soap mixed in, nothing fancy. Spray the valve stem generously. Bubbles mean air is escaping from the valve itself, not the tube. That changes everything about how you fix it.
Valve leaks are sneaky. There’s no audible hiss. The tire just feels mysteriously softer by morning, and you assume puncture, and you’re wrong.
Testing Presta Valves
Presta valves have that small brass screw at the top. Unscrew it counterclockwise — one full turn, not more. Spray soapy water around the stem where it meets the rim. Bubbles there mean the valve core is bad. Replacements run about $4 at any shop. Park Tool and Lezyne both make them. The right tool pops the old core out in seconds, new one threads right in.
No bubbles? Screw it back down and move on. A properly functioning Presta holds tight.
Testing Schrader Valves
Schrader valves — the car-tire style ones — have a removable core sitting flush inside the stem. You’ll need a valve core removal tool. They cost $2. Seriously, $2, and they fit in any seatbag. Unscrew the core counterclockwise a few turns. Don’t pull it out yet. Just break the seal.
Spray the base of the valve stem. Bubbles mean the core worked itself loose. Tighten it back down — firmly. Not gorilla-grip pressure, but seated properly.
Still bubbling? The core is worn out. Bike shops carry replacements. Auto parts stores carry them too. Unscrew the old one, thread in the new one, done. They’re interchangeable across every brand I’ve ever touched.
Probably should have opened with this section, honestly. I’m apparently prone to ignoring valves entirely, and that oversight cost me two days chasing a puncture that never existed — all over a $3 part.
Step 2 — Find the Puncture With the Bucket Test
Valve passed inspection. The leak is in the tube. Time to actually find it.
Pull the tire and tube off the rim completely. Inflate the tube to around 80 PSI — this matters more than people realize. Tiny slow leaks won’t produce visible bubbles at 30 PSI. You need real pressure forcing air out fast enough to actually see something.
Fill a bucket or bathtub with water. Submerge one section of the tube at a time. Work methodically around the entire circumference. Very slow leaks take 10 to 15 seconds to bubble up, so don’t rush past any spot. Mark the hole with a permanent marker the moment you find it. Then deflate completely before doing anything else.
But what is the bucket test, really? In essence, it’s just isolation — removing every variable except the tube itself. But it’s much more than that. It’s the difference between guessing and knowing.
Step 3 — Check the Rim Strip and Rim Bed
This is where most guides stop. This is also exactly why your tire goes flat again next week.
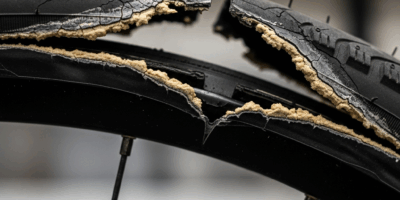
Before the patched tube goes back into the tire, inspect the rim bed. Spin the wheel slowly. Look for tears, gaps, anything shifted in the rim tape — that thin plastic or fabric strip covering the spoke holes. Without intact tape, spoke holes work through your tube gradually. Slowly. Seemingly at random.
Run your finger along the inside of the rim bed. Smooth and continuous is correct. Peeling, wrinkled, or torn means that’s your actual problem. That puncture you just found in the bucket? The bad rim tape probably caused it in the first place. That’s what makes properly maintained rim tape so important to us riders who want to stay on the bike instead of fixing it.
Replacing rim tape isn’t complicated. Peel the old tape off completely. Standard rolls come in 18mm for narrower rims and 25-27mm for wider ones — your rim width is usually stamped right on the sidewall. I’m apparently a 25mm person and Stan’s NoTubes tape works for me at around $6 per roll, while cheap shop tape never seems to seat right. Don’t make my mistake and skip measuring first.
Start applying new tape at the valve hole. Stretch it slightly as you wrap to keep it taut. Smooth as you go. Puncture a small opening where the valve stem needs to pass through. So, without further ado, reassemble — but only after confirming everything underneath is solid.
Patching vs. Replacing the Tube
You’ve found the problem. Now the decision.
Patch holes smaller than 4mm. Use vulcanizing patches — the type where you apply glue, wait a full 3 to 5 minutes, then press down firmly. That wait time actually matters. The rubber bonds to the tube. Glueless patches work roadside in an emergency, but they fail overnight surprisingly often, especially in humidity or if the tube surface wasn’t cleaned properly first.
Replace the tube if the hole is larger than 4mm or sitting anywhere near the valve stem. That area is structural. Patching near a valve stem is temporary at best. A replacement tube runs $10 to $15 — worth every cent versus repeating this entire process in four days.
Once everything checks out — valve seated, puncture patched or tube swapped, rim tape confirmed intact — reassemble and inflate to whatever pressure is printed on your tire sidewall. Not higher. Overpressure stresses the bead and introduces new problems you don’t want.
One preventive move that actually works: check pressure every Sunday. Takes 30 seconds with a floor pump. A slow leak that would flatten your tire overnight shows up as a 5 PSI drop over a week. Catch it early, run through this sequence once, and the overnight flat stops being part of your life.


Stay in the loop
Get the latest cycle tech trends updates delivered to your inbox.