Why Your Chain Only Skips When You Push Hard
Drivetrain troubleshooting has gotten complicated with all the conflicting advice flying around. As someone who’s destroyed two cassettes and a derailleur hanger chasing phantom skipping issues, I learned everything there is to know about load-specific chain skip. Today, I will share it all with you.
So, without further ado, let’s dive in.
But what is load-specific chain skip? In essence, it’s when your drivetrain loses grip exactly when you’re pushing power — climbing, sprinting, punching through rough terrain. But it’s much more than that. It’s a diagnostic signal. The chain holds fine while you’re coasting or spinning easy, then slips the moment tension spikes. That pattern is telling you something specific, and it’s worth listening to.
Your drivetrain has three wearing parts. When any of them degrade, engagement breaks down under load. Worn chains stretch. Cassette teeth morph into shark-fin shapes. Stiff links bind mid-rotation. That’s what makes load-specific skipping different from ghost-shifting or random cross-cassette jumping — it isolates to one or two gears, only under pressure. That specificity matters. It points you toward a fix instead of a full parts-bin explosion.
Step 1 — Check Chain Wear Before Anything Else
Probably should have opened with this section, honestly.
Start here. Always. I replaced a cassette once — a $70 Shimano HG500 — and had skipping continue on the very first climb afterward. A fresh cassette on a stretched chain is just money leaving your wallet in slow motion.
You need a chain wear indicator tool. The Park Tool CC-3.2 runs about $15 at most bike shops and is worth every cent. Snap it onto your chain while it’s still on the bike. Two pins. If the chain slides into the 0.75mm slot without resistance, you’re still good. If it drops into the 1.0mm slot, that chain is done.
Replace it immediately — at least if you want your new cassette to last longer than a season. Not tomorrow. Not after one more ride. A stretched chain will not grip a new cassette any better than a trashed one. You’ll have identical skipping, and you’ll blame the cassette when the real problem is still wrapped around your crankset.
New chains run $20 to $60 depending on brand and speed count. I’m apparently a cheap-chain person and KMC works for me while some premium options never seemed to last any longer. Don’t make my mistake of assuming price equals durability — mid-range chains replaced on schedule beat expensive chains replaced too late every single time.
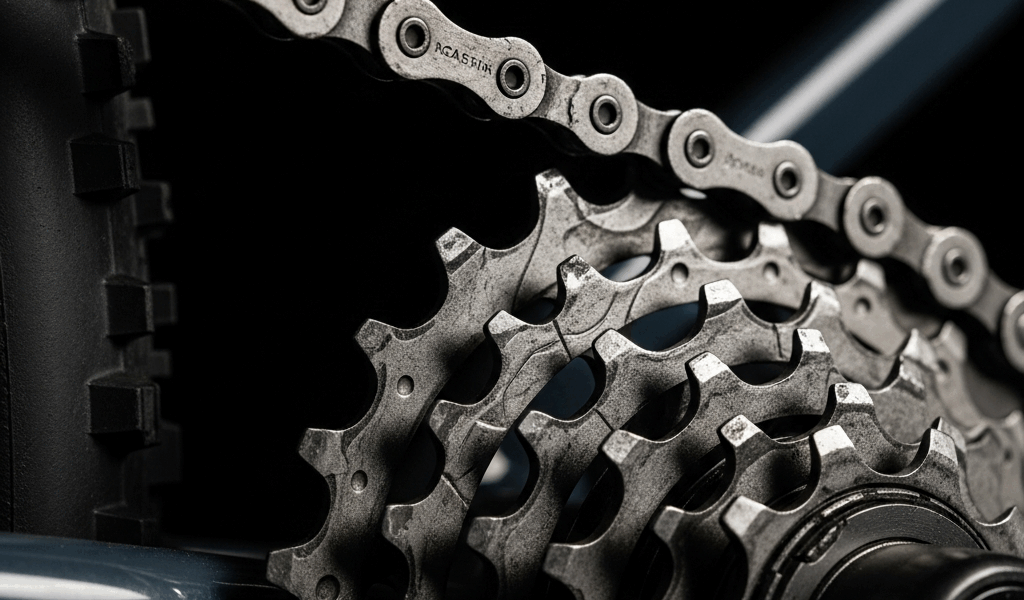
Step 2 — Inspect the Cassette for Shark-Fin Teeth
Worn cassette teeth look unmistakable once you know what you’re looking at. The teeth hook forward — like a shark fin — instead of standing straight up. Catch them in direct sunlight and the shadow gives it away immediately.
Focus on your two or three most-used sprockets. Most riders live in the middle of their cassette, usually a 16, 18, or 21-tooth cog depending on configuration. Rotate the crank backward slowly and watch those teeth from the side. A noticeable forward lean or hook at the tip means the cassette is worn past usable.
That hook is why a brand-new chain still skips under load on an old cassette. The worn tooth pulls the chain sideways under tension instead of holding it. Install a fresh chain and it slides right off the same hooked teeth. Same problem, new parts, same frustration.
Cassettes run $40 to $150 depending on quality and speed count. A nine-speed cassette costs noticeably less than a twelve-speed — the HG200 nine-speed sits around $25, while eleven and twelve-speed options climb fast. Mid-range Shimano or SRAM options usually land between $60 and $80.
If both chain and cassette need replacement, do the chain first. A new chain on a worn cassette will show you exactly how bad the cassette damage is within a few rides — usually dramatically. Either way, if both are worn, you need both new. Staggering the replacement doesn’t save you anything except a second trip to the shop.
Step 3 — Find and Fix Any Stiff or Damaged Chain Links
Frustrated by a situation where neither the chain wear indicator nor the cassette teeth showed obvious damage, I backpedaled slowly one afternoon and just watched — specifically watching the chain move through the rear derailleur pulleys. One link wouldn’t flex. Completely rigid.
That’s a stiff link. And it absolutely causes load-specific skipping without any visible wear on chain or cassette. That’s what makes it tricky.
Do this yourself: shift to the smallest cog, then pedal backward slowly and watch the chain travel through the top derailleur pulley. Every section should bend smoothly. If one spot stays rigid and refuses to flex, you’ve found it.
Try working it free first. Grab the chain on either side of the problem link with your thumb and forefinger, then work it side to side gently for about thirty seconds. Sometimes that’s genuinely all it takes — a little movement and it frees right up.
If that doesn’t solve it, use a chain tool to remove the offending link entirely and reconnect the chain without it. You’ll lose one link — which might require dropping down one tooth on the smallest cog or stepping up one on the largest — but one lost link beats skipping on every climb for the rest of the season. A decent chain tool runs $12 to $25. The Park Tool CT-5 at around $20 handles basically every chain type you’ll encounter.
Step 4 — Check Derailleur Limit Screws and Cable Tension
Cable stretch happens slowly. Imperceptibly. New cables have some elasticity built in — after months of riding, they settle and lose tension. When the rear derailleur cable stretches, the derailleur sits slightly farther from the cassette than it did when new. The chain still engages, just not with full authority.
Under easy pedaling, loose engagement holds. Under load, it fails. The chain skips.
Find the barrel adjuster on your rear derailleur cable — a threaded collar usually where the cable exits the derailleur body. Turn it counterclockwise one quarter-turn to tighten the cable. Ride and test. Still skipping? Another quarter-turn. Repeat until it stops or the derailleur starts ghost-shifting to lower gears on its own, which means you’ve gone too far.
Limit screws are a different beast. The H screw controls high-end travel, the L screw controls low-end. If you’re skipping under load on one specific gear, a limit screw could theoretically be out of adjustment — but honestly, load-specific skipping is rarely a limit-screw problem. That’s more commonly behind chain drop or cross-chaining noise.
Cable tension adjustment costs nothing. Limit screw tweaking costs nothing. Do both before spending a single dollar on parts.
This diagnostic order matters. Chain wear first — cheapest and most common. Cassette teeth second — the second most frequent culprit. Stiff links third — rare but fixable without buying anything. Cable tension last — free, but unlikely to be the sole cause. Most riders find their answer in the first two steps and are back riding the same afternoon. That was certainly true for me — twice now, embarrassingly.


Stay in the loop
Get the latest cycle tech trends updates delivered to your inbox.