Making Sense of Bike Light Specs
Bike light shopping has gotten complicated with all the lumen wars and marketing claims flying around. As someone who’s ridden thousands of miles in the dark with various lighting setups, I learned everything there is to know about what those specifications actually mean for real-world riding. Today, I will share it all with you.
Bike lights serve two purposes: letting you see the road and making sure cars see you. The numbers manufacturers tout — lumens, runtime, beam patterns — can be confusing. Most of it is marketing. Here’s what actually matters when you’re riding at 20 mph in the dark.
The Lumens Game
Lumens measure total light output — how much light a source produces. Probably should have led with this section, honestly: lumens alone don’t tell the whole story of how a light actually performs.
- Beam pattern matters more: 500 lumens focused in a tight spot lights the road differently than 500 lumens spread wide. A narrow beam lets you see farther; a wide beam reveals more periphery.
- Lens quality affects usability: Poor optics create dark spots or glare even with high lumens. Quality lights use engineered reflectors and lenses to put light where it helps.
- Lux matters for actually seeing: Lux measures light intensity at a distance, which determines how far ahead you can see. A light can have fewer lumens but produce more lux at 10 meters through better optics.
How Many Lumens Do You Actually Need?
That’s what makes this question endearing to gear reviewers — the answer depends entirely on where you ride and how fast you go:
- Urban commuting (lit streets): 200-500 lumens for seeing, focus on being seen with good flash modes. Streetlights do most of the work; your light fills gaps and alerts drivers.
- Suburban roads (partial lighting): 500-800 lumens front, plus strong side visibility for intersections. You need enough light to see into shadows between streetlights.
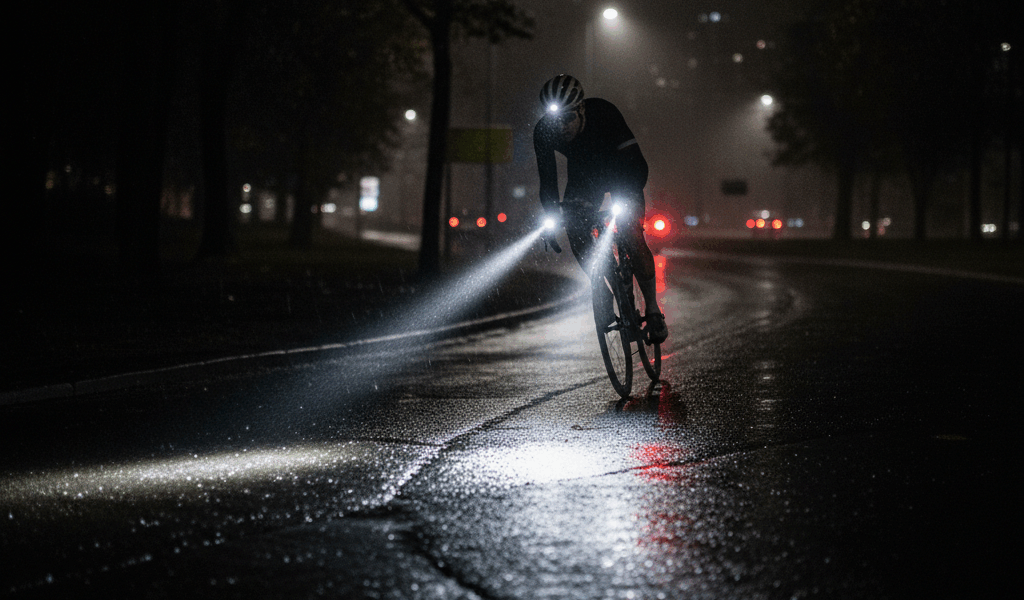
- Unlit roads: 800-1,500 lumens with good throw so you can see far enough at speed. At 25 mph, you cover 37 feet per second — you need to see obstacles early enough to react.
- Trail/MTB night riding: 1,500+ lumens, often with a helmet-mounted supplement for directional fill when you look into turns.
Runtime Reality
Manufacturers quote runtime at various power levels, and this is where things get deceptive. Pay attention to which mode provides the rated runtime:
- High mode runtime: Often just 1-2 hours at maximum brightness — fine for short commutes, useless for long rides. This is the spec that grabs attention but rarely reflects actual use.
- Medium mode: Usually the practical setting, 3-6 hours typical, and often plenty bright. This is what you’ll actually use most of the time.
- Low/eco mode: Can stretch to 10-20+ hours but may not provide adequate light for actual navigation. Good as a backup when your battery is dying.
Battery Considerations
Built-in rechargeable: Convenient for regular use. USB-C charging is now standard; avoid older micro-USB designs that are becoming obsolete. Consider lights with pass-through charging for long rides where you can connect a power bank while riding.
Removable batteries: Swap a fresh battery mid-ride on long events. Some systems use standard cells (18650 lithium) that you can buy anywhere; others use proprietary packs that lock you into their ecosystem and may not be available in five years.
Front Light Categories
Commuter Lights (200-600 lumens)
Optimized for urban use with broad beam patterns that illuminate the road while avoiding blinding oncoming traffic. Good ones include daytime flash modes for visibility and side lighting that helps at intersections where cars approach from angles.
Worth considering:
- Light & Motion Urban 500: Excellent beam cutoff prevents glare, 500 lumens, around $79. The cutoff line means you can run it on high without blinding pedestrians.
- Lezyne Lite Drive 1000XL: Versatile output range, compact design, around $70. Good all-arounder that handles most situations.
- Cygolite Metro Pro 1100: Strong value with good beam pattern, around $65. Budget-friendly without feeling cheap.
Road Lights (600-1,200 lumens)
Balanced for speed on unlit roads. Throw distance becomes important here — you need to see far enough ahead to react at 25+ mph. Look for focused center beams with peripheral fill so you don’t miss that pothole in your periphery while staring down the road.
Worth considering:
- Exposure Strada MK11: Premium optics with excellent throw, $250+ but built to last years of daily use. The beam quality justifies the price.
- Light & Motion Vis 1000: Wide beam perfect for mixed conditions, around $130. Good choice if you ride varying terrain.
- Bontrager Ion Pro RT: ANT+ compatible for bike computer control, around $150. Integration with Garmin lets you adjust modes without reaching for the light.
High-Power Lights (1,200+ lumens)
Maximum output for trail riding or fast descents on unlit roads. Often paired with helmet lights for directional fill when you turn your head to look into turns. Weight and heat management become factors at these power levels — some lights get genuinely hot after extended use on high.
Battery capacity matters more here. Running 1,500 lumens drains batteries fast. Look for lights with external battery packs or very large internal batteries if you need this much output for extended periods.
Rear Lights
Rear lights are entirely about being seen. Daylight visibility has become the key differentiator among quality options. Look for lights specifically designed with daylight flash modes — they use focused beams and pulse patterns that catch driver attention even in bright conditions when you’re just another object on the road.
Side visibility matters for intersections. Some rear lights include amber side LEDs or angled optics that make you visible from 90 degrees. This matters when you’re waiting at a light and cars are approaching from the side.
Beam Patterns and Cutoffs
European regulations have pushed manufacturers to develop lights with cutoff lines — like car headlights — that illuminate the road without blinding oncoming traffic. These matter more for urban riding where you’ll encounter pedestrians and other cyclists regularly.
MTB lights prioritize flood patterns that light up peripheral vision. The trade-off is less focused throw distance, which matters less at trail speeds but more on fast road descents. Match your light choice to where you actually ride.
Mounting Considerations
Most lights mount to handlebars, but position affects usefulness. Low mounting creates long shadows that reveal road texture and potholes. High mounting reduces shadows but may create more glare for oncoming traffic. Some riders run two lights — one low for seeing, one higher for being seen.
Quick-release mounts let you remove expensive lights easily when parking in sketchy areas. Tool-free installation also means you can swap lights between bikes quickly.
Bottom Line
Don’t chase lumens. A 500-lumen light with excellent optics often performs better than a cheap 1,000-lumen light with poor beam shaping. Match your light to your typical riding conditions, budget for runtime that covers your longest regular rides, and prioritize being seen as much as seeing the road. The best light is one that you’ll actually charge and use consistently.

Stay in the loop
Get the latest wildlife research and conservation news delivered to your inbox.